

Look, we’ve been trying to keep this on the down low at HPN, but recently we contributed to a book called Footballistics. A fair amount of our contributions related to the draft and trade period, and with Carlton’s 2018 trade intentions in the news, we thought we’d provide some unsolicited advice for Silvangi and the Blues (and the Suns if they fall into the pick).
The analysis in this post, as for the book, is based on Player Approximate Value (PAV), which is a player valuation system we can extend back to the 1980s (and potentially beyond) to get a good sample of valuations for both player careers and the future worth of draft picks. It was the system used in the Footballistics extract published in the Herald Sun, which discussed the best-rated seasons and careers since 1988.
Trading top 10 picks for players directly hasn’t been the greatest move, but it can work
The hot trade talk this year involves Carlton trading for an established star like Dylan Shiel using their presumptive pick one (which there is still a little bit of doubt whether they will get it or not). In the book we actually look at the three trades involving pick one in the past, so we won’t go over it here. What we will do instead is to potentially cover the possibility that Carlton may rise a little over the rest of the year, and may still want to trade the pick for something other than a raw swap for a player.
For the book we worked with a sample of 1993 to 2009 for the trade period, in order to better cover the future careers of players traded. We will (mostly) use the same period for this piece.
In this period, there were 39 trades involving a top 10 pick. Of the 19 trades that involved just a pick (or multiple picks) for a player, the side receiving the pick received more value 13 of those times. Of all 39 trades, the side receiving the higher pick won the trade 26 times. Spoiler alert: high picks are valuable.
Some of these trades seem stupid in retrospect, but all were made for a good reason – for all the hypothetical value of a draft pick, the actualisation of a real player matters. Until a player is firmly attached to a pick, all it contains is the potential of getting the eighth best young player in the country. On the other hand, Jason Mooney would be standing right there with 97 games and 51 goals to his name already, with a hulking frame holding his proven highlight reel at AFL level. The name “Jude Bolton” wasn’t in the mix, but he was pick 8 that year. His pick wasn’t just swapped by the Cats for Mooney that year, but also had earlier gone to Geelong so Richmond could acquire Craig Biddiscombe, who we are all sure you remember.
In Footballistics we looked specifically at the disastrous Wayne Carey trade, amongst others, but there are plenty of examples like this floating around the AFL. Trading a top 10 pick for an established player can work, but you have to really think through the big risks on both sides first. What we can report is that in the long term, these kinds of trades have historically favoured the club who ended up with the draft pick, to the tune of about 30 PAV per trade (roughly two good seasons by a good player) on average.
Multiple assets are good!
We allude to this in the conclusion to Footballistics, but several of the most valuable trades of the draft era involved the trading of one (or sometimes two) players or picks for a smorgasbord of other options. Three of the five biggest losses for the side receiving the top 10 pick were where that side gave up more assets (players and picks), while one had equal numbers going each way.
The worst of these had Sydney giving up picks 12 (Adam Ramanauskas), 44 (Heath Scotland), Paul Licuria and Mark Orchard for pick 3 (Nic Fosdike). That is a bad trade, even if Fosdike was fairly handy for the Swans.
We developed our Draft Pick Value Chart to give a value to each draft pick, from an expected 147 PAV at pick 1, 77 PAV at pick 10, and so forth. The chart of those picks looks like this: Note that the decline in values after pick 10 is quite shallow – there is still value to be had in the 30s and 40s. But how does this translate to the likelihood of a player having a good career rather than washing out after a few seasons? It would be possible, after all, for the “average output” of a pick to come in the form of a lot of underwhelming plodders, or alternatively for it to come as a few stars and a bunch of complete failures. Clubs would probably prefer the latter pattern.
What we need to do for this is find the “strike rate” for finding actual good careers, which the stars that a high pick must generally be looking to secure.
It turns out that “strike rate” of genuinely successful draft picks doesn’t drop as dramatically as is popularly supposed past the top few picks. We’ve tried to look at it at the chart below, defining success by players reaching certain career thresholds.

We have chosen 100 and 150 career PAVs because they roughly represent the top 25% and 10% of player careers in our sample respectively. Players with 150 career PAVs typically have multiple seasons of All Australian contention, while 100 PAVs usually sees players either have a long but undistinguished career or short and bright one.
Outside of the top 3 selections, the likelihood of success flattens out quite dramatically. From about pick 6 to about pick 20, for instance, a club is about a 1/3rd chance to get a player in the top 25 percent of all AFL careers. Beyond that, the strike rate is still respectable, making multiple shots with picks in the 20s or 30s quite a viable drafting strategy.
In recent years, the trend remains similar within the limitations of shorter and ongoing careers – the strike rate of picks is fairly flat beyond the first few picks. While recruiters are probably getting a little better at their jobs over time, drafting here and abroad is very much still an imprecise science.
So, multiple assets are valuable. But not all picks and assets are the same. While multiple assets gives a club more chances to succeed, especially if in the form of decent draft picks, just grabbing three random role-players is likely to be a bad idea, Wayne.
Carlton, of all clubs, should already understand this given the mixed success of their trading for GWS fringe players.
How about trading for pick 1?
Let’s circle back to the original thesis of the post: if Carlton (or the Suns) trade pick 1, what should they seek out in return? What would be a fair return on investment?
Let’s start out by saying Dylan Shiel is unlikely to be worth pick one on his own.
HPN has looked at players valued at 18 to 20 PAVs in their age-25 season, like Shiel in 2017 and 2018, to see what they produced for the rest of their careers. Across 45 such players in the sample, only six earnt as much as the expected output for pick one (about 147 PAV as noted above). They are Sam Mitchell, Paul Salmon, Stephen Kernahan, Matthew Boyd, Scott West and Nick Riewoldt.
These are all good players, and if you had traded pick 1 for them at age 25 you would be quite happy with the result. But there are also six players who accrued less than 50 PAVs for the rest of their career from this sample; players like Brownless, Porplyzia, Atkins, Gleeson, Starcevich and Dickie.
The contrast between the top group and this one is stark, and demonstrates that a player’s future career is never set. Draft picks carry a failure risk, but players do too – injuries and early form decline can always strike.
As a group, the 45 players averaged 92.4 PAV for the rest of their careers – almost dead on our value for the output of pick 6. This is a reasonable estimate for the future output of Shiel, albeit with a fair margin for error either way.
And multiple picks for pick 1?
After doing a bit of research, a smarter idea for Carlton might be trading pick 1 down to get multiple draft assets, if possible. We’ve gone ahead and crunched the maths for a bunch of hypothetical two-for-one pick trades, as below, and how they would have done historically.
First, according to our Draft Chart, here are the trades that would roughly provide the same amount of value for each side: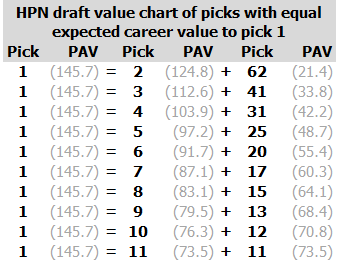 Some of these swaps probably sound more reasonable than others given current trading custom, but that doesn’t mean current customs are actually best practice.
At any rate, let’s have a look, year by year, at the outcomes of various hypothetical swaps based on the actual outcome of those drafts. These spreads of numbers represent the actual (not projected) careers of each pick in each year, relative to the actual number 1 picked player that year. So for 2001 ,everyone drafted that year is being compared to Luke Hodge.


The walls of green and yellow here are good for the theory that trading down is often a pretty good idea. Last week we stated that only two players taken at number 1 were the “right” choices, in that they turned out to have the most valuable career of their draft class. This is clearly a pretty low historical success rate.
The value of pick 1 is that it is by far the safest selection in the draft as we saw above – it is unlikely to produce an actual bad player, on average it gives a club someone in the top 10% of all careers. It is, however, far from guaranteed to produce the best of the class.
Quite often, a side would have been better off trading pick 1 for two lower selections. This looks to be the case even if those lower selections were lower than clubs might typically countenance parting with pick 1 for. For example, Pick 1 for picks 5 and 25, or picks 10 and 11, might actually be even money swaps. If somehow a side can get three picks inside the top 30, it is usually a slam dunk – so much so we aren’t even charting it here.
What is perhaps more useful is looking at the broader trends of how often this 2-for-1 swap would be a successful move, on average. First, here’s the sample through to the 2009 draft.
There has however, more recently been a bit of a run of pick 1s being slow starters. If we extend the sample out to 2014, the win rate on the “two lower picks” side looks a bit greener:

Recent years are less complete for obvious reasons, and there’s every chance any of Swallow, Patton, Whitfield, Boyd or McCartin start to improve from here relative to their draft cohorts, but it’s still a notable run of relatively under-performing pick 1 players.
Ignoring the consistent and anomalous failures of picks 4 and 6 for much of the draft era, in general it seems that sides are better than even money to “win” if they swap pick 1 for two picks, where one is within the first 5 or 7 picks and the second one is also at least in the top 20 or so. This approach distributes the risk of one selection across two, which means total failure is probably less likely, and that a club can reap higher dividends if both lower picks come off.

It’s here that the line of “fair trade” boxes is pretty indicative. If a trade is well above those boxes, it would probably be the right move for Carlton. If it is south, they are probably not going to get as much out of trading pick 1 as keeping it themselves. If it’s close, it’s more a judgement call about list needs and draft pool analysis.
So, what does that all mean?
Keeping pick one is the safest, most conservative option on the table for Carlton (or the Suns) right now, and especially for their recruiters who would stand to be criticised more harshly should such a swap not pan out.
However, it must be said that each draft class is unique (as we talk about in the book and can be seen in the variation year-to-year in the charts above). The assessment of the strength of a draft class as a whole is critical to any such deal. Such draft pool assessment is beyond our expertise, but we can note some past examples where clubs made bold moves based on their assessment of the pool. Port Adelaide, for example, rated the 2016 draft so much more highly than the 2017 one that they sought to trade out of 2017 and get extra picks within the top 30 of 2016. Then in 2017 itself they traded down the draft, into the 2018 draft, and for established players.
If Kevin Sheehan is correct with his assessment that the top 20 of this draft is as strong as any other previous class, it would make sense for struggling clubs to load up with as many selections as possible to replicate Geelong’s golden era, or Hawthorn’s 2004-06 drafts. Distributing chances across multiple selections makes drafting a less “boom/bust” exercise, for clubs with weak lists, a larger quantity of slightly inferior prospects could be very valuable, and extra picks also expand options for trading for players.
The question is whether clubs might be willing to be on the other end of such a the deal. If trading for a quantity of slightly lower picks is the smart move for a club at the foot of the ladder, someone has to be a partner in that swap. Some clubs, with much better list situations, may seek to move up the draft to target a particular player they see as key to their already well-developed list plans.
We’ve seen reports that Adelaide might be one such club this year. They currently hold Melbourne’s first round pick, Carlton’s second round pick, and their own first round pick, and would also be able to trade a future pick as well. If the year ended right now, the Crows would hold picks 8, 13, and 19, and a future first round selection nominally around pick 8 as well. Some of that currency might be very handy in Carlton’s hands, if Adelaide thinks that adding one very highly rated youngster in particular position is what it needs to do this year.
This isn’t without precedent in other codes with a draft process. In the NFL, teams regularly trade up early in the draft to tab (mostly) quarterbacks; in the top 10 of the 2018 draft there were three such moves. Most rebuilding teams need much more than one asset to become a contender, while most contenders often feel like they are only missing one or two pieces.
These are all gutsy moves, but ones firmly in Carlton’s court.